Free shipping on all kits
← All kits

Ranch Sentinel parts list

Tank Alarm Kit

Get a signal when the water drops below a set height.

Choose your kit

Parts kit

$259

Every part in one box. You put it together with the step-by-step guide.

Shipping included. Ships in 2 to 3 weeks.

Prefer to buy the parts yourself?

Affiliate disclosure: The current parts links are non-affiliate. We will label any paid affiliate links here.

Tank Alarm Kit

  • Low-power nRF52 Meshtastic-compatible radio, such as a US915 Heltec T114 or RAK4631 WisBlock with base boardHeltec T114 ↗ RAK4631 options ↗
  • 915 MHz antenna with a connector matched to the radioMatch to your build
  • Weatherproof enclosure, small solar panel and charge circuit matched to the selected board and cellMatch to your build
  • Compatible 18650 cell and holder with verified connector and polarityMatch to your build
  • Float switch rated for the tank and intended water use, with a suitable bracketMatch to your build
  • Outdoor two-wire cable and a cable gland sized to the leadMatch to your build

This build reports a low-water state. Pick the Tank Level Kit for a continuous reading.

How it connects

  1. 1 Float switch
  2. 2 Compatible radio contact input
  3. 3 Ranch mesh

Connection overview. Confirm model-specific wiring and power before assembly.

Field guide · Build notes

Set up this kit

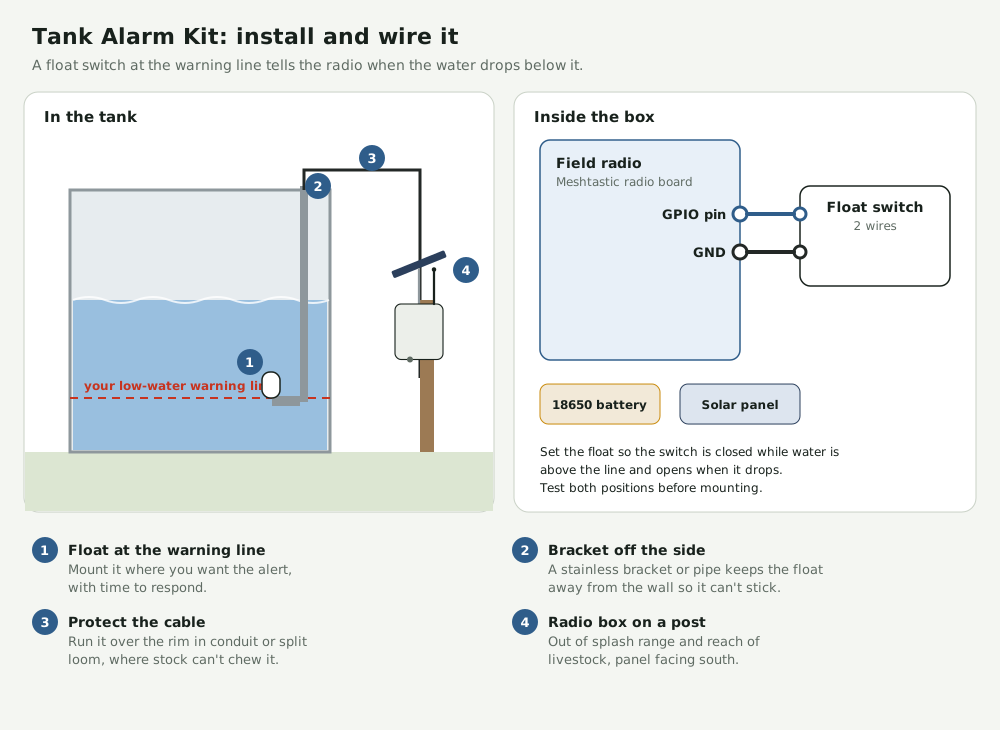
Float on a bracket at the warning line, wired to radio GPIO and ground
Open full-size diagram ↗

Before you start · Tank-rated float switch, bracket, protected cable run and wire tools.

  1. Prepare the radio
    Attach its antenna before powering it. If it needs firmware, use the Meshtastic flasher with a USB data cable and select the exact model and revision.
  2. Join your ranch mesh
    Set the region to US for US915 hardware. Import the ranch channel from the base and match the modem preset. Keep the channel QR code private because it contains the channel key.
  3. Set the warning height
    Mount the float clear of the tank wall and turbulence. Choose a height that leaves time to respond. Check that the contact closes at normal water level and opens as water drops.
  4. Wire and protect the cable
    With power disconnected, connect the dry contacts to a supported GPIO and ground. Protect the cable over the rim and keep the enclosure out of livestock reach.
  5. Configure Detection Sensor
    Choose the actual GPIO you wired. For a switch that closes to ground in the normal state, enable the pull-up if supported and trigger on high. Verify both states on the bench and choose a status interval suitable for your mesh.
  6. Weatherproof the node
    With power disconnected, verify connector polarity and the approved charging setup before attaching the battery and solar panel. Seal the cable entry with a gland and leave a drip loop.
  7. Test low and normal states
    Move the float safely through both positions. Confirm the received states and any test alert before relying on the install.

These are example layouts. Confirm the pinout, power and fit for your exact parts. Field validation is pending.
Meshtastic flasher · Detection Sensor settings

Set it up in the app